
Not too long ago there was a time when we needed to either a photographer or take out our manual or semi-automatic cameras to capture moments. This process used to be elaborate, after clicking these photographs we needed to develop it either personally or take the help of some local professional to see the result. An advanced camera equipment used to be prized possession of a few. Then the digital scene took the center stage and it changed everything. Within a span of 15 to 20 years, it completely changed the entire scenario. Then came mobile phones, smartphones etc, photography transformed once again, maybe forever. It seems change is the only constant in the world of photography. But why am I saying all this here? This post is not about the history of photography! Perhaps this post is about how to adapt and click beautiful photographs almost every time. This post is about a few basic rules of photography if you call them rules or composition techniques, which remained unchanged even when everything around photography changed. One may be using a high-end DSLR camera or just starting out with an entry-level DSLR or using a basic point and shoot camera or even a smartphone these rules remains the same for everyone! Yes, you read it right, for everyone!
Well, I don’t want to sound preaching but the next time you take your camera or that smartphone out to click some photographs, try to keep these points in mind and you would notice the improvements. I am sure that many others like me who are using a DSLR camera to take photographs are often asked this common question which camera it is when they show a beautiful image to someone or post it to social media. Though most of the time I ignore such harmless queries but it may frustrate the photographer who might have woke up before the sunrise, trekked or drove to reach a place on time, experimented countless times with settings then show you the most beautiful one! This is one of the biggest misconceptions in the world of photography is that many of us think better camera means better photographs! The truth cannot be far from it. Of course, these pieces of equipment are great but how can anyone just ignore the person holding the camera? Well, they cannot be blamed either. Photography equipment makers with deep pockets have left no stone unturned to make one believe that it’s this camera or that lens which took that great image displayed as a large hoarding overlooking one of the busiest thoroughfares of your city. Of course, these equipments are excellent but again someone skillful and creative enough has to press that shutter button, right!
So what makes a good photograph? Well, the list is long but there are a few basic composition techniques which if kept in mind then it can create more balanced or good-looking photographs and these are applicable to all kinds of image making equipment, yes, your smartphones too.
1.Rule of Third: Most common yet so many people miss this basic composition rule while taking photos. As the name suggests, all you have to do to divide your frame into three imaginary equal parts, both horizontally and vertically. This will create nine imaginary squares and four intersecting lines. The subject of your picture should be placed where these intersecting lines meet. Is it sounding too technical? Ok, let us see the following illustration-
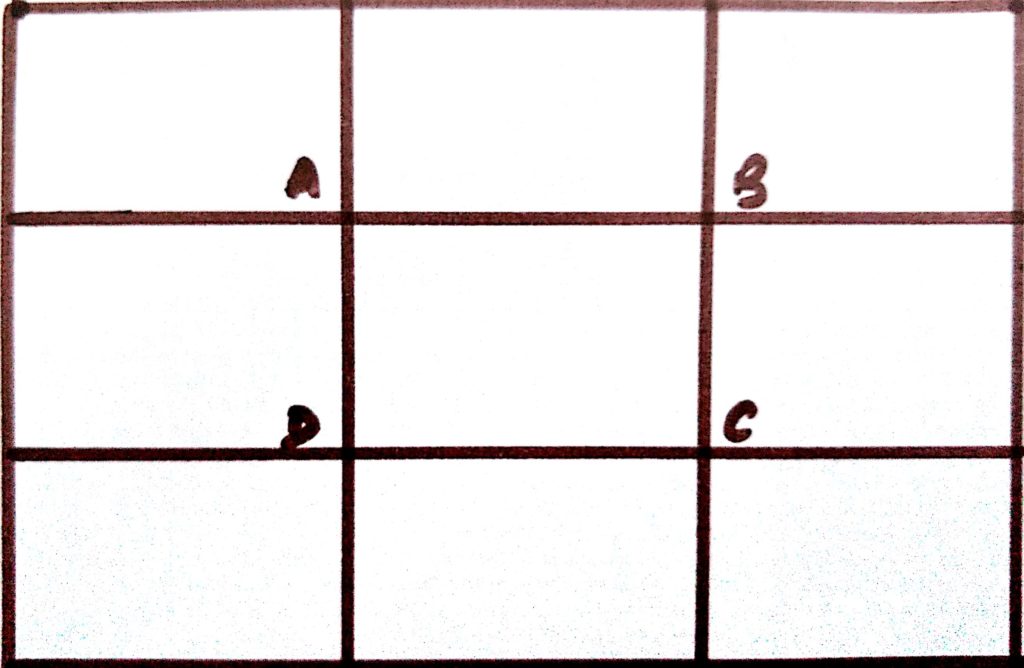
The intersecting points marked as A, B, C and D. All you have to do is to place the subject of your picture roughly near these intersecting points and click it.
The following pictures will make things pretty clear-


In picture (a) the lighthouse is almost in the middle of the frame. Though there is nothing wrong in it but placing the same lighthouse towards the left, as shown in picture (b) of the frame simply makes the picture more pleasant. Isn’t It?
Look at the next two frames.


Here the beautiful seaside resort is again in the middle of the frame (c). It looks ok but now look at the picture (d) where I have placed the same resort towards the right, followed the rule of thirds. The result is evident. The second picture enhances the visual appeal to a different level altogether. Hope the above two illustrations make this easier to understand.
2. Keep the horizon straight and off the center – Just observe Facebook, Instagram etc, everyone is busy showing their pictures, be it from last holiday or some family function or just a selfie. Nothing wrong in it. Millions of photographs are getting uploaded every day. A casual observation will reveal that in many of these pictures the horizontal lines are not straight or horizon is bang in the middle of your picture. Just observe the following three pictures for clarity-


Can you see the difference? Observe the straight and off the center horizon line( where water and sky look meeting). Such a simple observation on your part while clicking any photo can change the way it looks. It can be noticed that this is one of the major flaws of many pictures posted on social media these days. All you need to do is hold your hand straight and practice. One can also observe the live view mode of your camera or the screen of your smartphone before placing the click button.
3. Fill the Frame and watch the background– As it suggests try to fill your frames. Save your picture from unpleasant clutter from the background. This will make the subject of the picture more appealing. This works really well when you are photographing portraits or something very intimate. If you cannot fill the frame then try cropping the picture, though it reduces the feel. The following two pictures will illustrate-
4. Don’t cut anything or body parts– This is one of the biggest mistakes which would have unknowingly ruined countless of images. Remember you can always crop a picture to remove unwanted parts but cannot add anything to the same. The following two pictures will make things very clear-


5. Create Depth in the picture– This is especially useful when taking landscape photos. The foreground, middle and background details give depth to your picture and make it more pleasing. In fact, this is an elaboration of point number 2 already explained above. The following two photographic illustrations will make the things clear.

6. Take as many pictures as you can but display the best ones: Nothing is truer than this. No matter how good your editing skills are, if you don’t have enough options to work on them then you are limiting your skills. It is always good to have more options in your hand than lack of it. Don’t worry about space in your memory card. You can always delete the unwanted pictures. It is no rocket science to know that no of keepers are really very small. The same is applicable to what you show to others. Don’t bombard your Facebook or Instagram page with all 500 hundred photos you have taken on your last trip! For example, choose top 20 or 30 photos out of say 500 pictures. Remember quality is always better than quantity!
The above concepts have been evolved over a long period of time and were originally meant for painting students to make the paintings more appealing. The above rules are not rules in a real sense. In fact, the most important rule in photography is there are no rules! Yes! But still by practicing the above concepts would certainly take your regular photos to a higher level.
This post is dealing with only some of the basic concepts of photography. This post is not meant for pros or for those who are into photography for a long time. This particular post is for those who are just starting photography, for regular persons who are just like to preserve the memories or post them on social media. I like to end this post by quoting legendary Pablo Picasso “Learn the rules like a pro, so you can break them like an artist”. This is just the beginning.
Good web site you have got here.. It’s difficult to find excellent writing like yours
nowadays. I seriously appreciate people like you! Take care!!
Your photos look amazing. I would love to go here after reading your post. Thanks for some great tips on where to go
i read the post, you shared wonderful and great photos tips. Could you please suggest me which DSLR camers should i buy and i have only 50000 rupees budget?
Hello,
Thanks for your reply. Regarding Camera, You can go for Nikon D5300. Its a good camera.
nice post thanks
nice post thanks
nice post thanks